Welcome!
Let me start by saying that I acknowledge that this is an odd place to tuck away Girl Scout leader resources.
It seemed to be the easiest and most time efficient solution to all the requests I've received in response to a couple of different facebook-shares.
I just don't have the time right now to personally reply and send multiple emails with attachments to those interested. I do however have this old, abandoned, baking blog languishing in the web-o-sphere...so this is my happy medium!
I'll share meeting ideas and resources here on occasion, without much fanfare, for whomever is interested! Enjoy!
~ Audrey
10.16.19
Meeting Plan for Junior Jeweler Badge
We moved our meeting offsite for this badge, from our local library, to a nearby care center. We've done this once before, when working on the Social Butterfly badge, and it went so well we knew we wanted to go back!
For the first hour we worked on troop business and completed one jewelry project together as a group. The remaining steps were completed as the girls moved through stations throughout the room.
We opened the meeting up to the residents of the care center for the last hour and a half. As the girls worked through the jewelry stations, the residents went to two "freestyle" stations we had set up. Then, as the girls finished their required work, they created additional jewelry pieces with the residents that had joined us!
Arrival Activities:
The girls were instructed to view presented jewelry tools, a swaps collection and jewelry display of special pieces I brought from home. I also had a hieroglyphic alphabet chart printed, so they could try to decode my personalized Egyptian cartouche. Not many had time to try this at the beginning of the meeting, but several tried it as the meeting progressed.
The girls were also asked to wear a special piece of jewelry to the meeting. They were invited to share with each other what they brought and why it was important to them. We had a brief discussion about different types of jewelry, pieces that held special meaning, pieces that did a job, birthstones, etc.
Step 1. Get to know the tools of the trade
For this step I had a tray set out with several different jewelry tools that we would be using that day. As part of our arrival activity, the girls were asked to take a look at the tray of items to see if they could figure out what different tools were used for. Then as we worked through the other steps, they were able to use the tools and familiarize themselves with how they worked.
Step 2. Make jewelry with metal: Silver & Gold Cord Necklace and Stamped Metal Bracelet
We had two projects for this step, a Silver & Gold Cord necklace and a stamped metal bracelet.
Supplies needed:
-spool of leather cording (we used this from amazon)
-silver and gold hoop findings (we used something similar to these from Hobby Lobby, purchased when 50% off)
-metal jewelry washers (like these from Hobby Lobby. Do NOT make the mistake I did trying to save money buying regular washers! The metal was too hard and the girls had a hard time stamping hard enough to make impressions)
-metal stamping kit (I purchased this one for myself, 40% off from Hobby Lobby; and also borrowed one from a friend to use during the meeting)
I'll share the photo collages I made as I created the samples here. If you want to make your own station signs, you're welcome to copy and paste them into a word document. After printing the photo collage pages, I did number the photos sequentially just using a marker. I didn't add that to the documents because they were being fussy and I took the easy way out - lol!)
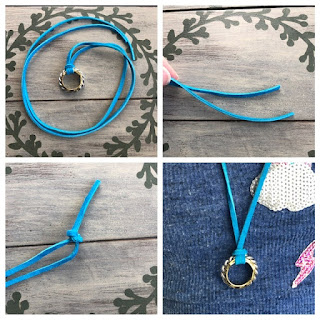
Silver & Gold Necklace
Stamped Metal Bracelet
This was all we used as far as directions for the girls. I did work with each group of 3 girls individually, to give them the basics on metal stamping. Other than that they were left to their own devices, with the photo collages. Those that had difficulty were directed back to their group to ask for help from one of their Girl Scout sisters. They did an amazing job of working together to figure things out!
If you're not familiar with metal stamping, there are a lot of amazing tutorials already out there.
Here's one I found helpful at Nunn Design.
Step 3. Make something inspired by another culture: Mala-inspired Bracelets
For this step we created Mala-inspired bracelets.
I brought my actual Mala and shared with the girls how I use it and what the different parts mean or are used for. I also created a display explaining the history and importance of using a mala, and explaining the properties of the gemstone beads we were using. Most of these documents I printed were things I found online, specifically on Pinterest. You can find them pinned on my Girl Scouts board here.
Supplies needed:
-gemstone beads (I purchased authentic amazonite and adventurine gemstone beads, along with rudruksha seed beads)
-mini tassels
-elastic cording, we used Stretch Magic
This was the jewelry project we did together as a group before inviting the residents to join us. Purchasing gemstone beads was a bit of a splurge, but because we were able to save a lot in other areas (and had a sizable amount of beads/jewelry supplies donated) it balanced out.
I had supplies to make one bracelet divided into individual bags for each girl. We sat in a circle on the floor and went through making the bracelets step-by-step together. I didn't take photos of the process for this one. It's basically sliding beads onto elastic cording and then tying knots. If you need something more detailed hit-up pinterest. Again, girls that were having a harder time received help from those that had already completed the step we were on. We do this a lot, so the girls get practice helping and teaching each other, as opposed to us stepping-in and doing things for them.
I also gave each girl a small organza bag to keep their Mala in, along with a printed and laminated card explaining when and how to use it. I also had some affirmation cards printed that they could choose from, they each took one that they connected with. The understanding was this could be the word/affirmation they use to chant/meditate if they choose to use their Mala that way. The card we used were found here.
Step 4. Make jewelry using every day objects
The girls loved all of the stations, but anytime they're given free reign to create, they are especially excited, so this one was a big hit!
I didn't print out any directions for this table. Just a few pictures of ideas of things they could create using the supplies given: friendship bracelets, button bracelets, paper beads, pipe cleaner rings. The only requirement was that they make at least one piece of jewelry using items on the table.
Supplies suggested:
-embroidery thread
-buttons
-scrapbook paper
-pipe cleaners
-fashion yarn and cord
Step 5. Make a sparkling gift: Juliette's Pearls Wishlets
We hadn't made S.W.A.P.S. as a troop in quite awhile, so we really wanted to work some in to this meeting. While these aren't traditional SWAPS (because they don't pin) they are wearable and they're a jewelry item that we're gifting to other troops! When I shared them on facebook there was a LOT of interest in swapping which had our girls very excited!
At this station the girls were tasked with creating as many bracelets as they could while they were there!
Supplies needed:
-satin twist cord (we used green)
-pearl beads (ours were 5mm beads with a 1mm hole)
These are so simple but super cute! We cut the string about 21" long (originally we were going shorter, but they were too small). Folded the string in half, strung a pearl (using little wire threaders I made out of washi tape and jewelry wire). Then secured the pearl with a knot on each side.
Originally I planned on putting each bracelet on an individual card. As we started mailing them we quickly realized that we'd save the girls a TON on postage by omitting the cards. Instead I used the same wording from the cards and copied it to the top of a word document, then we printed and attached all the bracelets for individual mailings to the paper using washi tape. I'll update here with a picture the next time we send a batch out. I still think the cards are super cute and fun for when we're able to swap these in-person, but not a lot of our local troops swap.
Freestyle Beading/Creating Stations
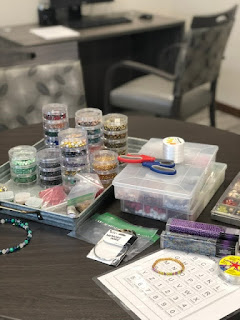
At the freestyle stations we basically just stacked several containers of assorted beads for the residents to use. I had elastic cord and memory wire so they could choose which type of bracelet they'd like to make.
I did have a Morse Code key printed at these tables. I told the residents, and our girls, how they could use different beads to make secret-messages on bracelets using Morse Code. They LOVED this idea and made several. If you want more info on that, I found this tutorial helpful.
All of the supplies at these stations were donated to us to use for this specific purpose! I put a post on facebook mentioning our plans for the meeting, and that the girls were already at the limit of their budget on supplies. Several people reached out and offered us supplies that they had laying around the house that they wanted to contribute. It was great! Going forward we plan on visiting the care center monthly for jewelry making sessions, so these supplies will definitely be appreciated!


